Versatile Installation Solutions
For optimal outcomes, we suggest opting for professional installation. Arspura provides two convenient service packages:
• Standard Installation – $199 (for new installations only)
• Comprehensive Installation – $299 (includes removal of your existing hood)

Supported Installation Methods
The Arspura range hood offers versatile installation options to fit your kitchen layout:
- Wall-Mounted: Securely attached to a vertical wall above your cooktop—perfect for open kitchen designs.
- Under-Cabinet: Installed under an overhead cabinet, with ductwork routed through the cabinet or ceiling for a clean look.
- Insert (Built-In): Integrated into custom cabinetry or a hood enclosure to create a seamless, built-in finish.
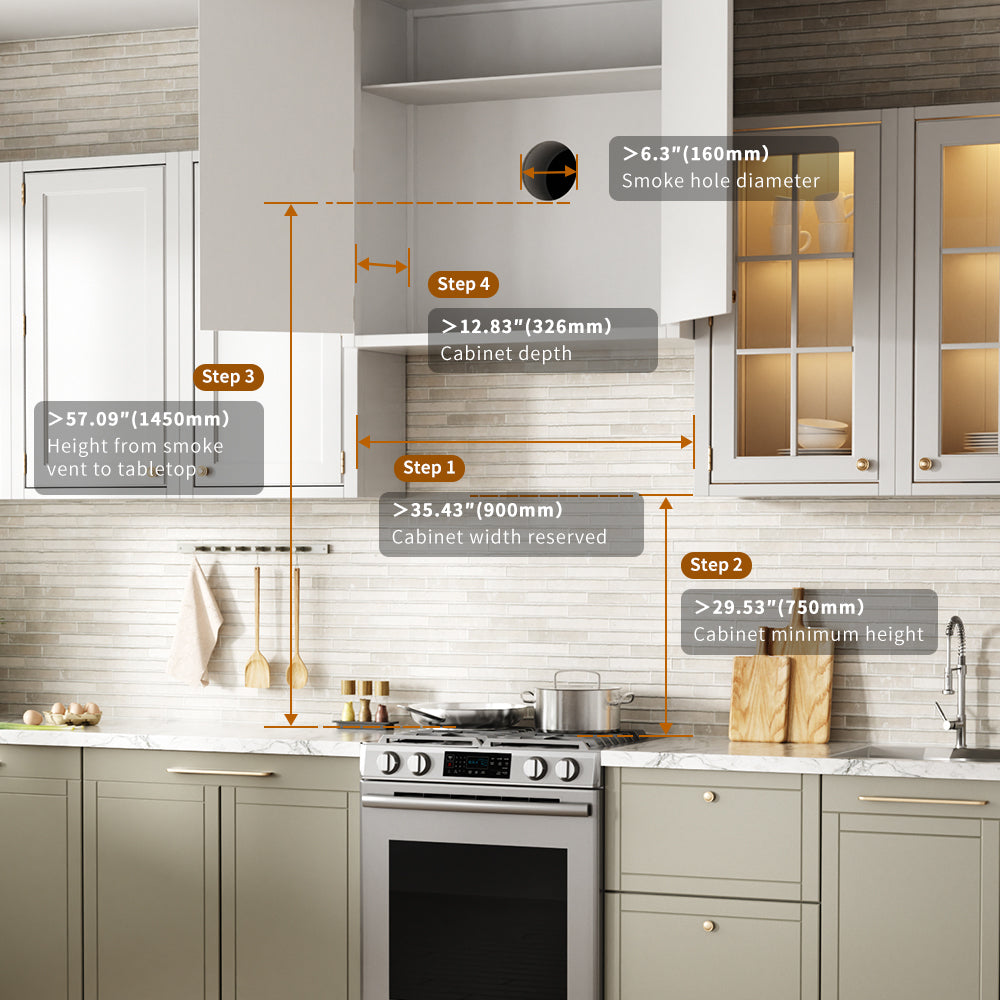
For optimal performance, install the hood at a height between 690–740 mm (27.17–29.13 inches) measured from the cooktop surface to the bottom of the hood.

Ensure Proper Wall Support
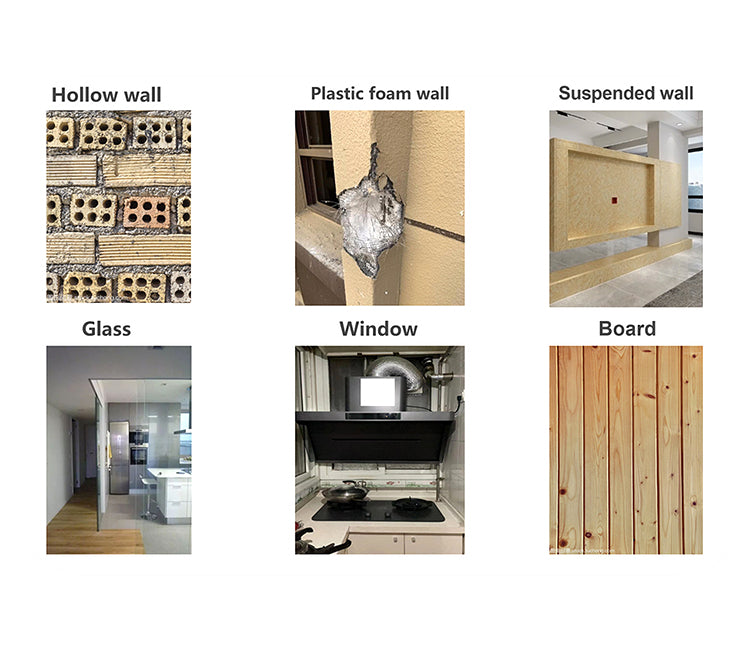
For safe and secure installation, Arspura range hoods must not be mounted on the following wall types due to insufficient load-bearing capacity:
- Hollow walls (e.g., perforated bricks or non-solid blocks)
- Walls insulated with plastic foam or similar materials
- Suspended partition walls lacking structural reinforcement
- Glass surfaces
- Window or window frames
- Unsupported wooden panels, including plywood or decorative paneling
Mounting on these surfaces may compromise the stability of the unit, leading to potential equipment damage or safety hazards.
If your kitchen features any of these wall types, we strongly recommend consulting our customer support team before installation to ensure proper guidance and avoid risks.

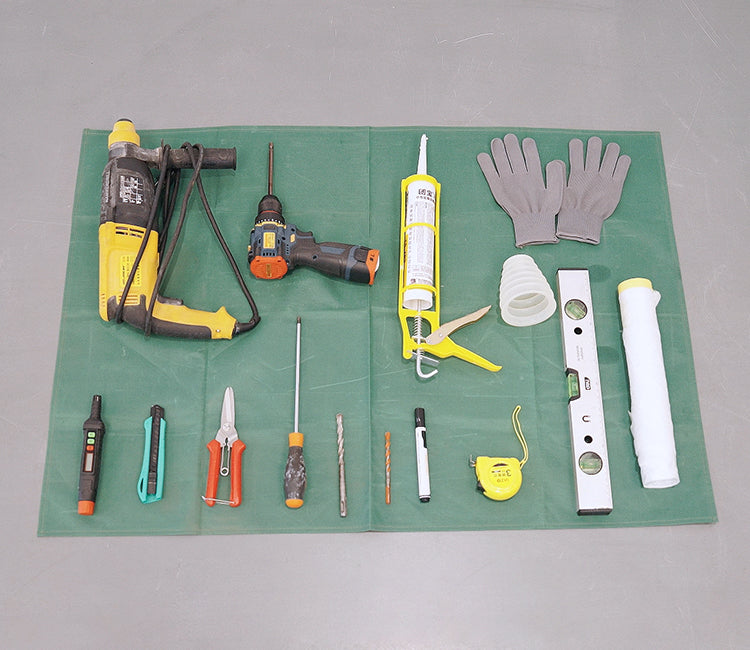
Required Tools for Installation
If you choose to install your Arspura range hood yourself, please prepare the following tools to ensure a smooth and safe installation process:
- Power drill with bits (wood, tile, concrete) & cordless screwdriver
- Tape measure, level, pencil, or marker
- Phillips & flathead screwdrivers, utility knife, scissors
- Caulking gun with sealant, foil tape, or duct clamps
- Voltage tester & duct adapter (if needed)
- Safety gloves, protective eyewear
- Ladder or step stool
- Disposable dust sheet (to protect kitchen surfaces)

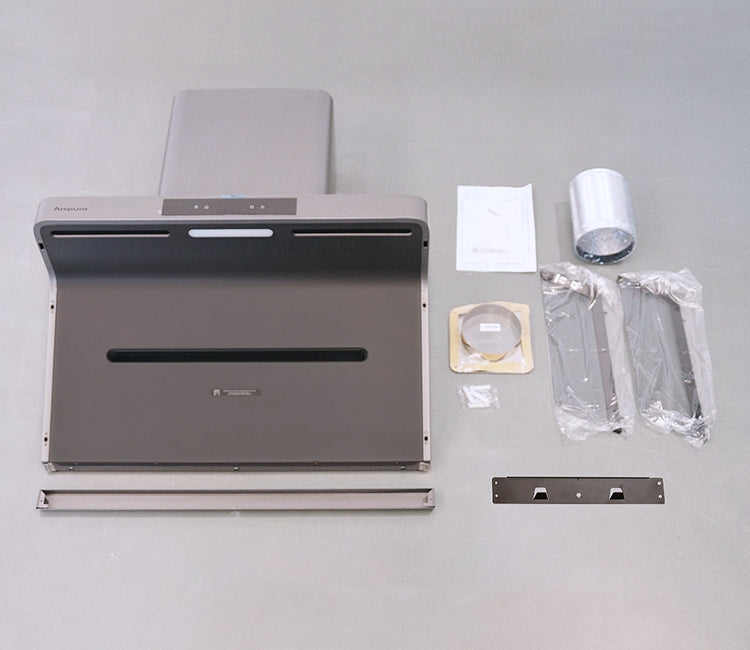
Here’s What You’ll Get
Main Components
1 × Kitchen Hood
1 × Hanging Plate
1 × Outlet Duct (Ø150 mm)
1 × Oil Cup
1 × Air Vent
2 × Smoke Screens
1 × Instruction Manual
Mounting Hardware & Accessories
1 × Self-Tapping Screw (ST4×8)
2 × Self-Tapping Screws (ST4×12)
4 × Expansion Tubes (10×50 mm)
4 × Wood Screws (ST5×50)
2 × Aluminium Foil Tapes (60×1400 mm)
4 × Self-Tapping Screws (M4×20)
Ventilation Requirements
-
Structural Support
Ensure that the wall or cabinet where the range hood will be installed can bear its full weight. Avoid installation on hollow walls or unsupported surfaces to maintain safety and stability. -
Electrical Specifications
A grounded 120V outlet with a NEMA 5-15P 3-prong plug is necessary. Avoid using extension cords or power strips. Always disconnect power before beginning any electrical work. -
Ducting Guidelines
Arspura range hoods must be connected to an external vent—they do not work with recirculation systems.Use a rigid, round metal duct that’s 150 mm (6”) in diameter. Avoid using flexible ducts.Keep the duct as short and straight as you can (≤3 meters, max 2 bends).Do not vent the air into hidden spaces like ceiling cavities, attics, crawl spaces, or garages. -
Dimensional Specifications
Recommended installation height: 690–740 mm (27–29”) measured from the cooktop surface to the hood bottom (control panel area).Minimum ceiling cavity height for vertical duct installation: 200 mm (7.87”).Clearance between the top of the hood and the ceiling should be at least 150 mm (5.91”).Cabinet opening dimensions: width ≥ 430 mm, depth ≥ 330 mm (recommended depth: 450 mm / 17.7 ”).Internal cabinet width should be no less than 425 mm (16.73”).Service access cutout on back panel: 430 mm (W) × 460 mm (H).
Step-by-Step Installation Video
Complete Installation Overview
Engineered to elevate your kitchen with precision, our range hoods combine top-tier performance with cutting-edge design, ensuring a seamless installation experience and lasting results.

Prepare the Installation Site
The user is greeted with a visually appealing welcome screen that introduces the app's purpose and sets a positive tone.

Create Openings in Wall or Cabinet
Use the included duct collar as a guide to cut the ventilation hole (Ø160 mm).

Install Brackets and Hood
Attach the mounting brackets securely to the wall or cabinet with the provided screws. Carefully lift and secure the hood onto the brackets.

Connect Ductwork and Power Supply
Fasten the metal duct with clamps or foil tape for a tight seal. Plug the unit into a grounded power outlet—avoid direct wiring unless instructed.

Functional Testing
Switch on the hood and check the suction power. Run it at high speed for 2 to 3 minutes to ensure proper airflow. Test additional features like delay shutdown and gesture controls.
Not Sure If You Can Install?
Frequently Asked Questions
Unmatched quality, innovative engineering,
and designs that elevate your space.
Can I Install the Range Hood Myself?
Yes. We provide a comprehensive installation manual and step-by-step video guides to assist with DIY installation. Please note that if you do not use an Arspura-certified contractor, you will be responsible for any installation-related issues.
Do You Offer Installation Services and Provide Mounting Hardware?
Yes. Arspura offers professional installation services and includes all necessary mounting hardware with your purchase.
What Are My Installation Options with Arspura?
You can choose between two service options:
- Basic Installation ($199): Professional installation of your new unit.
- Full Installation ($299): Includes Basic Installation plus removal of your existing hood.
Prefer to install it yourself? We provide easy-to-follow DIY instructions.
What Is the Installation Process for Arspura Range Hoods?
Arspura range hoods are designed for straightforward installation. You’ll find detailed steps in the user manual, and additional resources like blog articles and video tutorials on our website and YouTube channel. Professional services are also available.
What Should I Do When I Receive My New Arspura Range Hood?
Upon delivery, unbox the hood and verify all components are included. Follow the manual to install, connect the unit to power, and test its basic functions. Refer to our video tutorials for extra guidance.
What If I’m Not Sure Whether My Kitchen Is Suitable for Installing an Arspura Range Hood?
Contact our customer support team. To assist with evaluation, please share:
- A photo or video of your cooking area
- Measurements of your current hood or cooktop
- Cabinet depth (if applicable)
- Existing duct diameter (if available)
What Is Required for the Air Outlet?
A 160 mm (6.30") diameter duct is required for the exhaust connection.
How Should the Exhaust Pipe Be Installed?
Use a 150 mm (5.91") thick, three-layer duct where possible. Ensure it’s straight, under 3 meters in length, and bent no more than twice. All joints must be sealed tightly. A reducer ring may be used for smaller ducts, if properly sealed.
What Is the Recommended Installation Height?
The range hood should be installed 690–740 mm (27.1"–29.13") above the cooktop for optimal smoke capture.
What Are the Cabinet Installation Requirements?
- Minimum cabinet width: 900 mm (35.43")
- Minimum clearance: 430 mm (W) × 330 mm (D)
- Recommended cabinet depth: 450 mm (17.72")
- Rear panel access: 430 mm (W) × 460 mm (H) opening
What Are the Electrical Requirements for Arspura Hoods?
The IQV hood requires a 120V/60Hz power supply on a dedicated 10A circuit. Plug into a grounded outlet or hardwire securely.
Can a Range Hood Be Installed on a Tile Wall?
Yes. Proper tools, wall anchors, and fasteners are required to ensure safe installation on tile surfaces.
Can I Install the Range Hood Without an Overhead Cabinet?
Yes. For wall-mount setups, ensure the total height from cooktop to duct outlet is between 1462 mm and 1512 mm (57.56"–59.49").
How Much Does the On-Site Assessment Service Cost?
The service fee is $100. It includes a complete inspection of your kitchen’s installation conditions.
What’s Included in the On-Site Assessment Process?
Our technician will inspect:
- Wall type and structural support
- Key measurements (cooktop-to-ceiling, cabinet spacing, duct size/length)
- Existing or required duct openings
- Electrical and gas supply availability
- Site-specific ventilation suggestions
How Is the Appointment Scheduled?
After you request the service, a technician will contact you to arrange a convenient appointment time.
Does the $100 On-Site Fee Include Installation?
No. The fee only covers the inspection. Installation must be purchased separately. Custom service bundles are available—contact us for details.
Can I Use My Own Ductwork for Installation?
Yes, as long as your duct meets size and compatibility requirements.
Can Arspura Replace Damaged Ducting If Needed?
Yes. Replacement ducting is available for an additional fee. Inform the technician during your inspection.
Can I Cancel or Reschedule My Inspection Appointment?
Yes. You may modify your appointment up to 24 hours in advance. Late cancellations may not qualify for a refund.
Where Is the On-Site Assessment Service Available?
This service is available in the 48 contiguous U.S. states. Unsure about your location? Contact us with your ZIP code.
Do I Need to Book the On-Site Assessment Before Purchasing an Arspura Range Hood?
We recommend scheduling an assessment or reviewing our installation guide in advance. Proper installation ensures optimal performance, helps prevent installation issues, and avoids potential return costs.